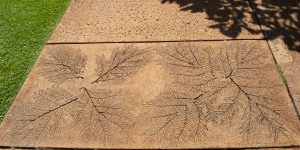
I have had a lot of people ask about my cement sidewalks. When we moved into our home a couple of years ago, the sidewalks were incorrectly slanted, so we repoured all the concrete, and of course, being an artist, I did not want the sidewalks to be plain. I had seen a technique at Kauai’s Allerton Garden, and Denver Botanical Garden of using foliage to imprint the concrete.
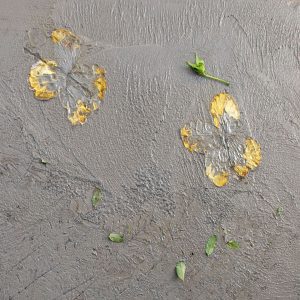
Photos from the botanical gardens that inspired my sidewalk:


I set out to research how to do it. There wasn’t much information out there. I pretty much could only find vague references that told me to wait until the cement was firm enough to keep the imprint, but soft enough to accept the impression. When I told the cement crew about what I wanted to do, they were a little nervous at first, but quickly proved to be essential to the success of the process. They were enthusiastic about the results since it is an affordable way to make sidewalks more decorative.
Here are the steps I took to make the imprinted sidewalk:
- Preplanning
Planning where you want the various plant impressions is critical. It turns out the cement cures quickly, so if you took time to cut plants, or even think too much about the design, it would dry too fast. I used Photoshop to plan out the exact placement and amount of the various plant materials, but you could sketch it to scale using graph paper too. Make sure the pattern looks good from all viewing angles. Choose plants that can be pressed very flat for best results. The best impressions for my cement were from ferns, ti leaves, hibiscus (! this one was surprising), palm fronds, and monstera. The ones that were hard to work with were heliconia flowers, torch ginger flowers, shower tree branches, and bird of paradise. I still got them to work, but they were difficult and not as beautiful in the final cement as the more easily flattened plants.
Sidewalk Pre-Plan Example 
Sidewalk Pre-Plan Example 
Sidewalk Pre-Plan Example - Cut the plants
Count the number of leaves and flowers and tally them by type. Have a list made up the night before. Go to the florist for any plants you don’t have in the yard. The same day of the cement, I cut the plants about 2 hours prior. I did have to go to the florist for the birds of paradise flowers the day before. I kept them in a vase overnight, and added them to the stack of raw materials in the morning.
Plants cut and ready to use 
Plants cut and ready to use - Have large trowels on hand to press the plants into the cement. Stage them near the site or ask to make sure your cement crew has them. large flat trowels will help press the plants into the cement.
- Pour the cement. Perform an initial smoothing. Let it set for a little while – this part is really dependent on the weather. It cannot be soupy wet, but it can’t be too far set – watch it carefully. Mine took about 15 – 30 minutes to get firm enough to take an imprint if I recall correctly.Then it was “go time”.
- Place all your leaves on the cement. This was an intense process – I had to be lightning fast in setting it up, referring to my printed out pre-plan constantly. We worked rapidly but we also had to press hard on the big trowels (The trowels we used were about 12″ X 24″ surface area) and really be fastidious to make sure the leaves and flowers were pressed evenly into the cement. It took a LOT of pressure. We ran into a situation at the end where we were actually walking on the large trowel to press the last few plants in place. I had many square feet of cement to manage at one time though. This would have been easier with less surface area.
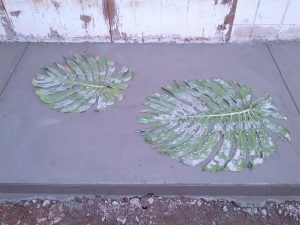
Monstera in the cement 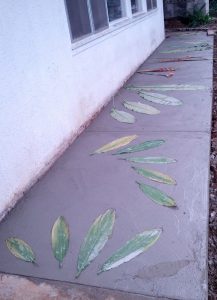
Ti leaves in cement 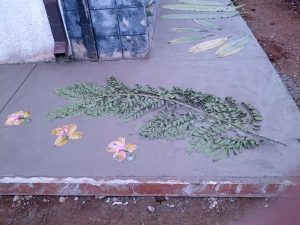
Hibiscus and a shower tree branch in cement - Leave the plants in place to dry. Some of them will peel out smoothly the next day, and some will get stuck to the cement. Let them naturally disintegrate. You can see the bits of hibiscus petals stuck in the cement in this photo.
Hibiscus petals disintegrate naturally - Give it time. The plants surrounding your new walkway will grow in and the plants will disintegrate. Enjoy your finished walkway!
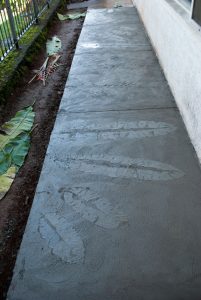
West sidewalk the day after cement pouring 
North sidewalk the day after pouring cement 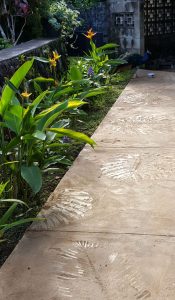
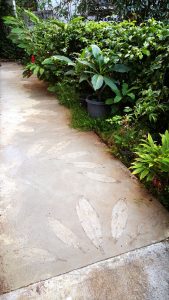
South sidewalk 4 months later 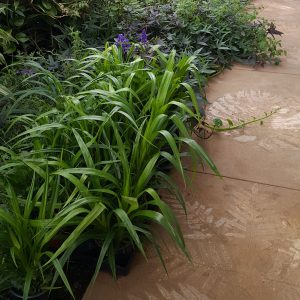
North sidewalk 4 months later
Thank you for the mention on your blog!